
Create a Video Social Network in 20 Minutes
Creating Your Own Video Social Network in Under 20 Minutes!
In this tutorial, you will build an MVP of a social network (aka TikRok) powered by Kaltura. Tikrok is a fully functional social network. Users can record videos using a built-in face filter, upload them, and browse other users’ videos.
Try it Live:
https://tik-rok.herokuapp.com/
Video Code Walkthrough:
Design Choices
Many shortcuts were taken in order to give you the barebones, simplest implementation of this concept aka an MVP. I chose a web front end to give a low barrier to entry across any platform. While recording does not work on all mobile browsers, the face filters do, and a more robust implementation could make use of Kaltura’s many Client Libraries
This is just a kernel…
Don’t limit yourself to copying TikRok, the purpose of this tutorial is to ignite your creativity. There are so many directions you could go in, for example, there are open source emotion recognition engines. Why not make an app that detects if someone is sad or angry and notify their friends they need cheering up? Food for thought. And it doesn’t have to be entertaining, think healthcare/covid-19, think education, think business, think food, fashion, music, finance, holidays, think what can I do with face detection, an augmented reality canvas or just something creative with video?

From https://github.com/justadudewhohacks/face-api.js/
Introducing TikRok
This sample, fully functional social network lets you use a funny face filter to make a video, upload it, browse everyone’s videos, and gives users their own page.
Getting Started
-
First, you will need a free Kaltura account: start a free trial
-
Clone the TikRok Github repo https://github.com/kaltura-vpaas/example-tikrok
-
Let’s take a look at .env.template:
ADMIN_SECRET=   //obtain from https://kmc.kaltura.com/index.php/kmcng/settings/integrationSettings
PARTNER_ID=     //obtain from https://kmc.kaltura.com/index.php/kmcng/settings/integrationSettings
PLAYER_ID=      //obtain from https://kmc.kaltura.com/index.php/kmcng/studio/v3
Copy
.env.templateto.envand edit the values above.We need to get your Kaltura Partner Id and API Admin Secret so let’s head over to Integration Settings tab

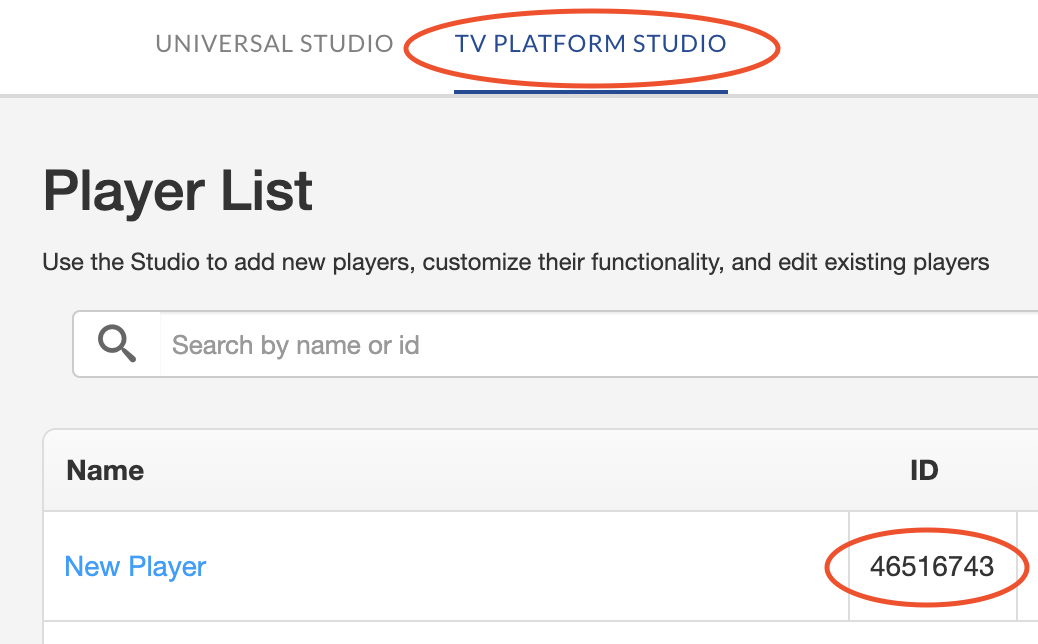
Head to https://kmc.kaltura.com/index.php/kmcng/studio/v3 , create a player and get its ID. Make sure to create your player through the “TV Platform Studio” as pictured:
- Install the components for node:
npm install
-
Its Showtime!! run
npm startand head to
http://localhost:3000
Connecting the back end to Kaltura
Pick a screen name and hit go:

The next touch point is the router.post('/', method of routes/login.js
var adminks = await KalturaClientFactory.getKS('', {type: kaltura.enums.SessionType.ADMIN});
var client = await KalturaClientFactory.getClient(adminks);
var user = await getOrCreateUser(client, req.body.userId);
var userKs = await KalturaClientFactory.getKS(user.id,{privileges: 'editadmintags:*'});
Take a look at lib/KalturaClientFactory.js to see how the Kaltura Session is created
We first create an admin session adminks which is required to create a user. Then we create a user session userKs and store the userKs to the node session so it can be used later.
req.session.ks = userKs;
And then we are redirected to the REALLY fun stuff: the face filter!
The Face Filter
We will use the open source face filter library https://github.com/jeeliz/jeelizFaceFilter There is nothing stopping you from getting very creative with these filters! You could supply your own artwork….the sky is the limit!
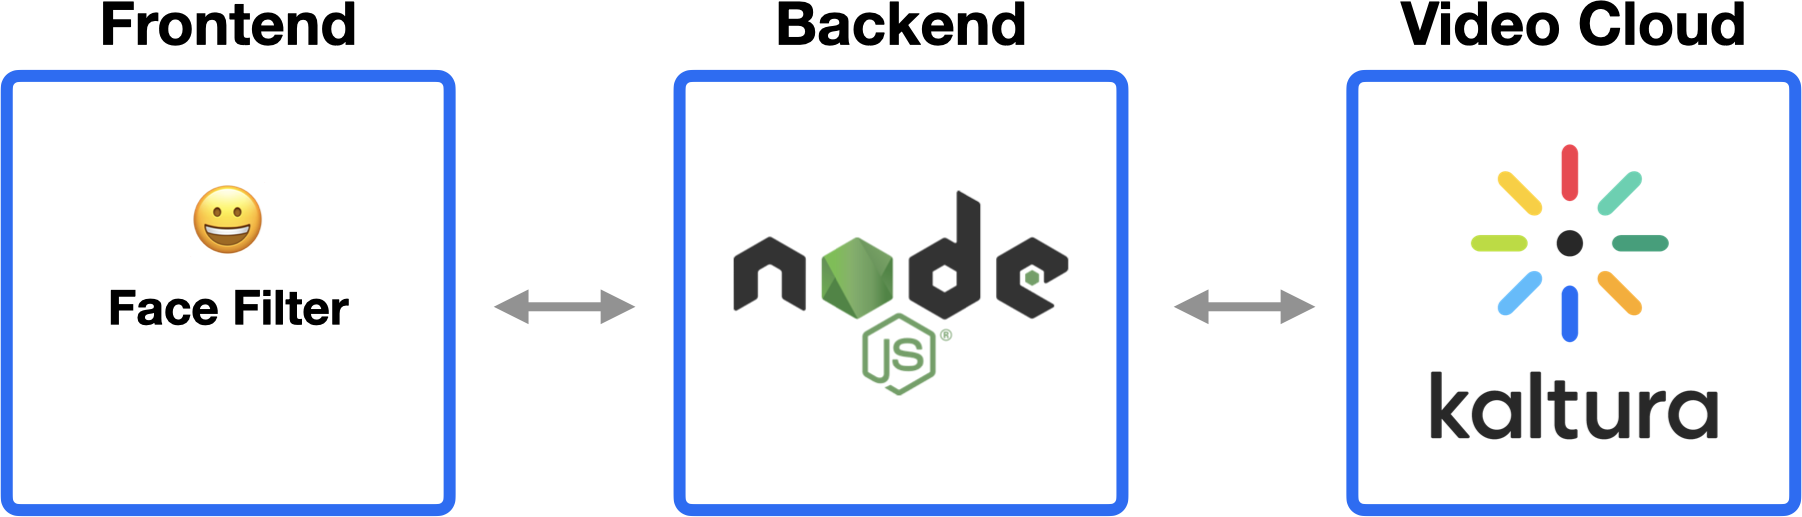
Here is a high level overview of the video creation work flow:

By itself, the face filter demo displays to a canvas element. Some of the demo’s use <divs> to display graphics on top of a canvas, those demos won’t work with our approach as we can only record what is actually on the canvas
Loading and Switching Filters
First, let’s set up the filter:
<style type="text/css">
.vidsize {
    width:600px;
    height:600px;
}
</style>
</head>
<body onload="init_filter()">
    <div class="vidsize" style="margin:0 auto;position: relative;">
        <div id="loading" class="loading">
            Loading Filter
            <br>
            <img class="loading" src="//assets/images/tikrok/loading_black.png">
        </div>
        <div id="filterRow">
            <a href="#" onclick="loadFilter('football')">🇫🇷</a>
            <a href="#" onclick="loadFilter('angel')">😇😈</a>
            <a href="#" onclick="loadFilter('deform')">🥴</a>
            <a href="#" onclick="loadFilter('faceswap')">😀🔄😀</a>
        </div>
        <div id="filterBtn"><a href="#" onclick="filterBtnToggle()">😃</a></div>
        <canvas width="600" height="600" id='jeeFaceFilterCanvas'></canvas>
        <div id="controls" class="vidsize"></div>
    </div>
So onload calls the initFilter() method from the default filter at public/filters/deform/deform.js which sets up the canvas element to render the face filter over webcam video. I created a naming convention the code uses to switch filters and it is:
public/filters/filtername/filtername.js and each filter has the same initFilter() method. When loadFilter(filter) is called it actually routes us to a completely different webpage:
function loadFilter(filter) {
	window.onbeforeunload = null;
  window.location = "/record?filter="+filter
And the filter is loaded through a query parameter:
<script src='facefilter/filters/<%=filter%>/<%=filter%>.js'></script>
Nothing is stopping you from switching filters entirely in javascript, just some refactoring would be necessary.
In case you are wondering about the #loading animated png…it displays by default on page load, and then is hidden by each of the four filters by calling
  $("#loading").hide();
} //end init_threeScene()
in deform.js
Setup Kaltura Express Recorder
In views/record.ejs we will use the Kaltura Express Recorder, which has the option to record a canvas element and combine it with your webcam’s audio.
Note:The github for TikRok includes a forked “canvas” version of express recorder named kaltura-canvas-express-recorder.js
<div id="controls"is where the Kaltura Express Recorder controls will be injected. These elements must all have the same video size to render properly. Now to instantiate the express recorder:
			 const expressRec = Kaltura.ExpressRecorder.create('controls', {
            "ks": "<%=ks%>",
            "serviceUrl": "https://www.kaltura.com", // IE http://www.kaltura.com,
            "app": "APP_NAME",
            "playerUrl": "https://cdnapi.kaltura.com", // IE http://cdnapi.kaltura.com,
            "conversionProfileId": "CONVERSION_PROFILE_ID",
            "partnerId": <%=partnerId%>,
            "uiConfId": <%=playerId%>,
            "canvasId": "jeeFaceFilterCanvas"
        });
We have supplied all relevant id strings from node, and we specify the canvas to record via canvasId Kaltura Express Recorder has many more configuration options and event listeners.
- We will also use the express recorder’s event listener interface to create a better UX:
 				expressRec.instance.addEventListener("recordingStarted", (e) => {
            console.log(e.type);
            //hide the filter buttons when recording has started
            $('#filterRow').hide();
            $('#filterBtn').hide();
        });

        expressRec.instance.addEventListener("recordingCancelled", (e) => {
          	//if use hits cancel button, then show the filters again
            $('#filterBtn').show();
            console.log(e.type);
        });

        expressRec.instance.addEventListener("mediaUploadEnded",(e) => {
           //once upload is finished, then move on to gallery
           window.onbeforeunload = null
           window.location="/gallery";
        });
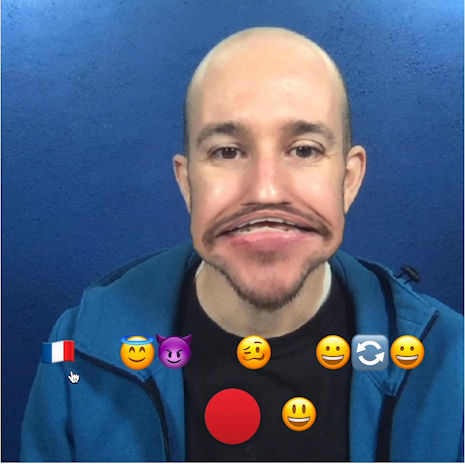
- You should see something like this:
The Gallery :
We are taking a very MVP approach to displaying the gallery with a simplifying assumption: this app will be the only source of videos connected to your account. If you want more control over how to organize videos, check out Playlists
The express recorder creates a Kaltura Media Entry for your video and associates it with your user id. Our approach will simply list all media in our account via the Media.list API call
Kaltura API Console
When you look at Media.list in the console:
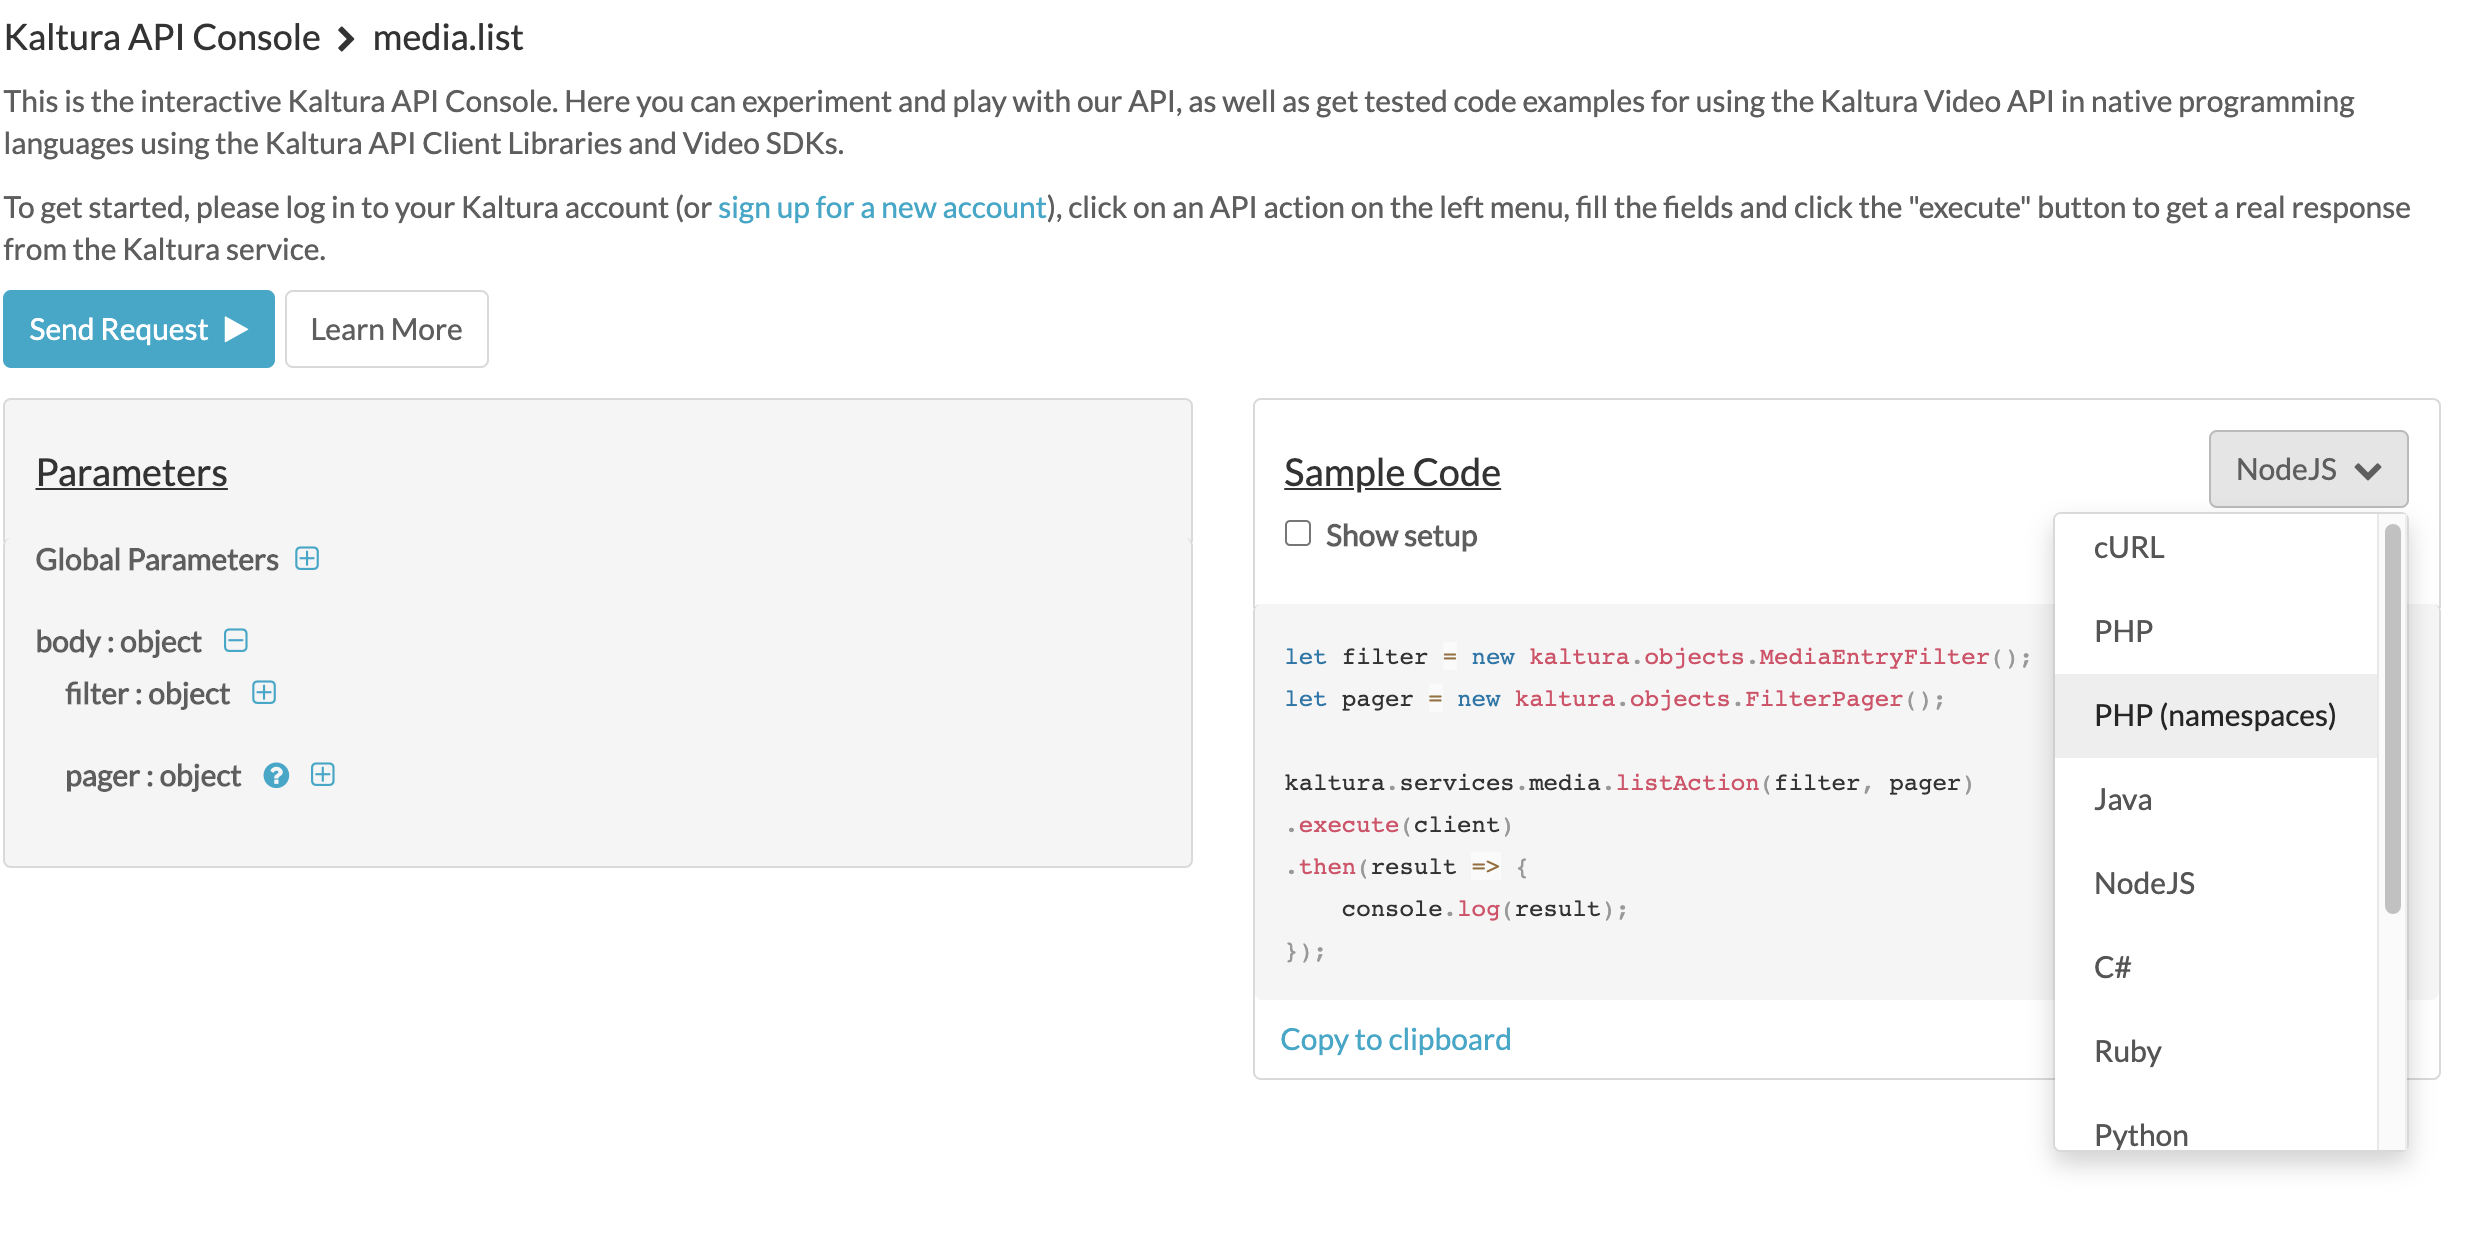
On the left, we can send the request or add parameters. On the right side you can auto-generate a sample code corresponding to the request on the left from all supported languages.
And the auto-generated code is very close to that of gallery.js :
function getMedia(client) {
    return new Promise((resolve, reject) => {
        let filter = new kaltura.objects.MediaEntryFilter
        filter.orderBy = kaltura.enums.MediaEntryOrderBy.UPDATED_AT_DESC;

        let pager = new kaltura.objects.FilterPager();
        pager.pageSize = 500;
        kaltura.services.media
            .listAction(filter, pager)
            .execute(client)
            .then(response => {
                resolve(response);
            });
    });
}
Animated thumbnails
We are using https://github.com/kaltura/VideoThumbnailAnimator in views/gallery.ejs to provide animated thumbnails for the gallery
    <div id="thumbnails">
        <%- include('gallery/entries.ejs', {entries: entries}) %>
    </div>
    <script>
        var thumbAnimator = new KalturaThumbAnimator();
        thumbAnimator.setup("videothumbnail", "http://cfvod.kaltura.com", 0, true);
    </script>
User Page
Querying for user’s Kaltura Media Entries
To display a users videos, We will use Media.list but this time we will filter by userId. You can build this query using the API Console:
let filter = new kaltura.objects.MediaEntryFilter
filter.orderBy = kaltura.enums.MediaEntryOrderBy.UPDATED_AT_DESC;
filter.userIdEqual = userId;
let pager = new kaltura.objects.FilterPager();
pager.pageSize = 500;
kaltura.services.media.listAction(filter, pager)
    .execute(client)
    .then(response => {
        resolve(response);
    });
Playing Video
in views/user.ejs
We will be following the steps to set up a player from https://developer.kaltura.com/player/web/getting-started-web
<script type="text/javascript"
src="https://cdnapisec.kaltura.com/p/<%=partnerId %>/embedPlaykitJs/uiconf_id/<%=playerId%>">
</script>
    <script type="text/javascript">
        try {
            var player = KalturaPlayer.setup({
                targetId: "playerContainer",
                provider: {
                partnerId: <%= partnerId %>,
                uiConfId: <%= playerId %>
                }
            });
        player.loadMedia({ entryId: '<%= entries[0].id %>' });
        } catch (e) {
            console.error(e.message)
        }
    </script>
And in routes/user/post.ejs we will load the player with:
<a href="#" onclick="player.loadMedia({entryId: '<%= entry.id %>'})"><img src="<%= entry.thumbnailUrl %>"></a>
AND - That’s It!
I hope this tutorial has helped show you how easy it can be to create a canvas-based application in node using the Kaltura VPaaS API
How you can help (guidelines for contributors)
Thank you for helping Kaltura grow! If you’d like to contribute please follow these steps:
- Use the repository issues tracker to report bugs or feature requests
- Read Contributing Code to the Kaltura Platform
- Sign the Kaltura Contributor License Agreement
Where to get help
- Join the Kaltura Community Forums to ask questions or start discussions
- Read the Code of conduct and be patient and respectful
Get in touch
You can learn more about Kaltura and start a free trial here
Contact us via Twitter @Kaltura_API or email: community@kaltura.com
We’d love to hear from you!
License and Copyright Information
All code in this project is released under the AGPLv3 license unless a different license for a particular library is specified in the applicable library path.
Copyright © Kaltura Inc. All rights reserved.
Open Source Libraries Used:
https://github.com/jeeliz/jeelizFaceFilter